【版本】
当前版本号v20230914
| 版本 | 修改说明 |
|---|---|
| v20230914 | 增加常见问题 |
| v20230913 | 修正activity_lifecycle.xml的context问题 |
| v20220909 | 增加常见问题 |
| v20220906 | 实验2.2补充代码 |
| v20220822 | 初始化版本 |
【实验名称】 实验2.1 编写一个能够互动的 Activity
【实验目的】
- 掌握布局和简单组件的拖拽使用
- 掌握新建Activity
- 掌握按钮点击事件
- 掌握 Toast 文字框
【实验环境】
- 一台运行 64 位版本的 Windows(8、10 或 11)、Linux、macOS(10.14 Mojave 或更高版本)或 Chrome 操作系统的计算机。
- 计算机可以访问互联网。
- 内存:至少6G
- 硬盘:至少空余20G
【实验要求】
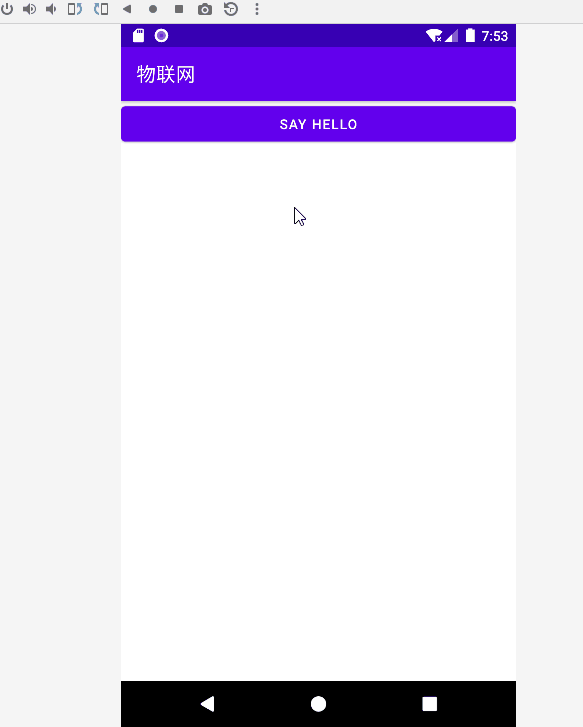
- 运行APP,点击按钮可以弹出文字框。
【实验步骤】
参考实验 Part1新建一个项目。
新建一个 Activity,命名为
FirstActivity。打开布局文件
activity_first.xml,拖拽一个布局Linear Layout和按钮进布局。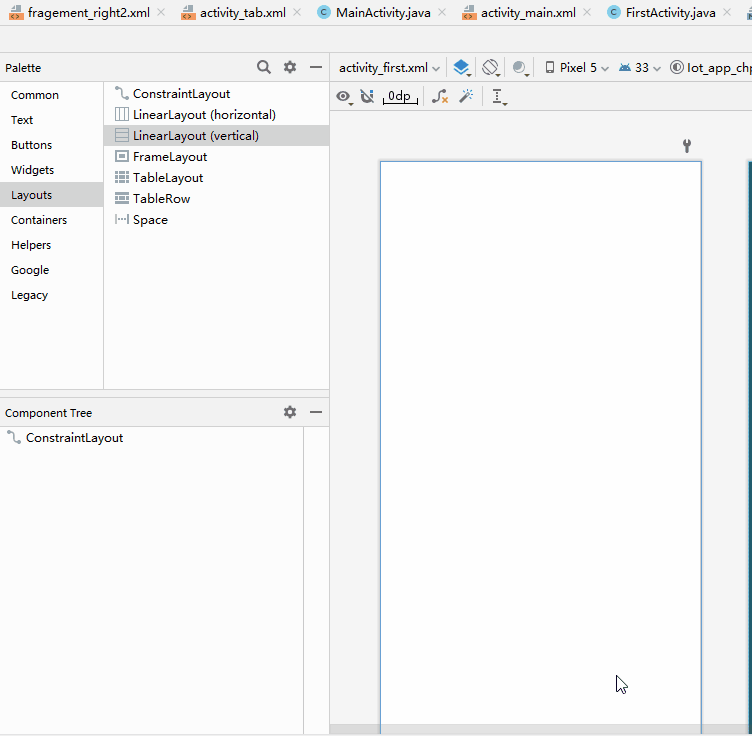
修改按钮的
id和text属性,activity_first.xml最终代码参考如下
<?xml version="1.0" encoding="utf-8"?>
<androidx.constraintlayout.widget.ConstraintLayout xmlns:android="http://schemas.android.com/apk/res/android"
    xmlns:app="http://schemas.android.com/apk/res-auto"
    xmlns:tools="http://schemas.android.com/tools"
    android:layout_width="match_parent"
    android:layout_height="match_parent"
    tools:context=".FirstActivity">

    <LinearLayout
        android:layout_width="match_parent"
        android:layout_height="wrap_content"
        android:orientation="vertical"
        tools:layout_editor_absoluteX="1dp"
        tools:layout_editor_absoluteY="1dp"
        tools:ignore="MissingConstraints">

        <Button
            android:id="@+id/hellobtn"
            android:layout_width="match_parent"
            android:layout_height="wrap_content"
            android:text="Say Hello" />
    </LinearLayout>

</androidx.constraintlayout.widget.ConstraintLayout>
- 修改 FirstActivity,增加按钮点击事件,实现弹出文字框。
FirstActivity部分参考代码如下,请同学们自己完成:
package iot.app.chp01;

import androidx.appcompat.app.AppCompatActivity;

import android.os.Bundle;
import android.util.Log;
import android.view.View;
import android.widget.Button;
import android.widget.Toast;

import java.time.Duration;

public class FirstActivity extends AppCompatActivity {

    @Override
    protected void onCreate(Bundle savedInstanceState) {
        super.onCreate(savedInstanceState);
        Log.i("FirstActivity","创建FirstActivity");
        setContentView(R.layout.activity_first);
        //通过根R和按钮ID找到按钮组件
        Button button2=findViewById(R.id.hellobtn);
        //添加点击事件
        button2.setOnClickListener(new View.OnClickListener() {
            @Override
            public void onClick(View view) {
                //TODO:同学们自己完成这里的关键代码
            }
        });
    }
}
- 设置
FirstActivity为主活动,启动应用会先启动此活动。
- AndroidManifest.xml
<?xml version="1.0" encoding="utf-8"?>
<manifest xmlns:android="http://schemas.android.com/apk/res/android"
    xmlns:tools="http://schemas.android.com/tools"
    package="iot.app.chp01">
    <application
        android:allowBackup="true"
        android:dataExtractionRules="@xml/data_extraction_rules"
        android:fullBackupContent="@xml/backup_rules"
        android:icon="@mipmap/ic_launcher"
        android:label="@string/app_name"
        android:roundIcon="@mipmap/ic_launcher_round"
        android:supportsRtl="true"
        android:theme="@style/Theme.Iot_app_chp01"
        tools:targetApi="31">

        <activity
            android:name=".FirstActivity"
            android:exported="true" >
            <intent-filter>
                <action android:name="android.intent.action.MAIN" />
                <category android:name="android.intent.category.LAUNCHER" />
            </intent-filter>
        </activity>
    </application>
</manifest>
【实验名称】 实验2.2 体验 Activity 的生命周期
【实验目的】
- 掌握 Activity 的生命周期
- 掌握每个操作对应调用的 Activity 的方法
【实验环境】
- 一台运行 64 位版本的 Windows(8、10 或 11)、Linux、macOS(10.14 Mojave 或更高版本)或 Chrome 操作系统的计算机。
- 计算机可以访问互联网。
- 内存:至少6G
- 硬盘:至少空余20G
【实验要求】
- 分别执行以下动作,观察日志输出分别调用哪个方法,并记录到你的实验报告。
(1)启动
LifeCycleActivity,点击返回。 (2)启动LifeCycleActivity,点击启动 DialogActivity,点击返回。 (3)启动LifeCycleActivity,点击启动 NormalActivity,点击返回。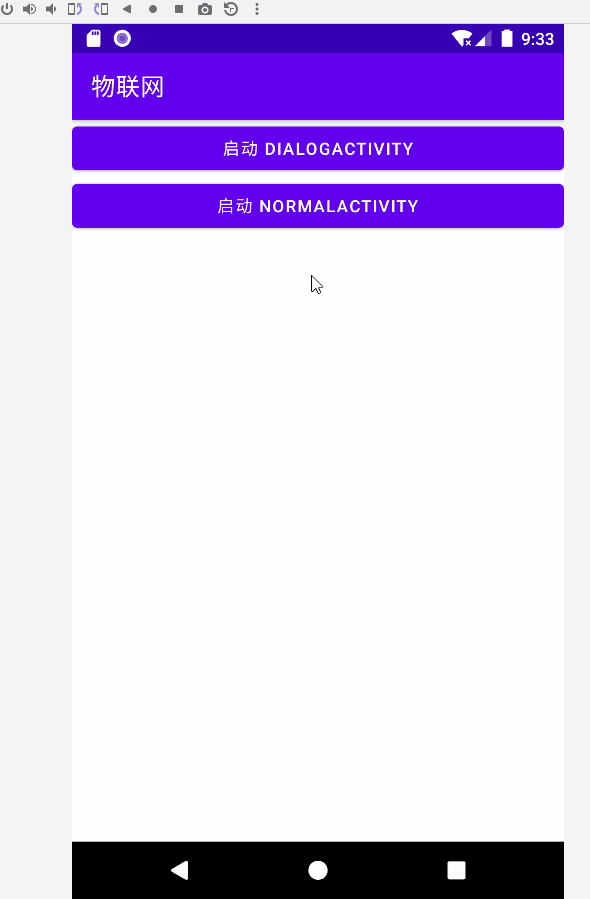
【实验步骤】
- 创建
DialogActivity,参考代码如下。
- DialogActivity
package iot.app.chp01.lifecycle;

import android.app.Activity;
import android.os.Bundle;

import iot.app.chp01.R;

public class DialogActivity extends Activity {

    @Override
    protected void onCreate(Bundle savedInstanceState) {
        super.onCreate(savedInstanceState);
        setContentView(R.layout.activity_dialog);
    }
}
- activity_dialog.xml
<?xml version="1.0" encoding="utf-8"?>
<LinearLayout xmlns:android="http://schemas.android.com/apk/res/android"
    android:layout_width="match_parent"
    android:layout_height="match_parent">

        <TextView
            android:layout_width="match_parent"
            android:layout_height="wrap_content"
            android:text="This is a dialog activity"
            />

</LinearLayout>
- AndroidManifest.xml 新增
android:theme属性,让 DialogActivity 以对话框的形式展示。
<activity
            android:name=".lifecycle.DialogActivity"
            android:exported="false"
            android:theme="@android:style/Theme.Dialog" />
- 创建
NormalActivity,参考代码如下。
- NormalActivity.java
package iot.app.chp01.lifecycle;

import android.os.Bundle;

import androidx.appcompat.app.AppCompatActivity;

import iot.app.chp01.R;

public class NormalActivity extends AppCompatActivity {

    @Override
    protected void onCreate(Bundle savedInstanceState) {
        super.onCreate(savedInstanceState);
        setContentView(R.layout.activity_normal);
    }
}
- activity_normal.xml
<?xml version="1.0" encoding="utf-8"?>
<LinearLayout xmlns:android="http://schemas.android.com/apk/res/android"
    android:layout_width="match_parent"
    android:layout_height="match_parent">
    <TextView
        android:layout_width="match_parent"
        android:layout_height="wrap_content"
        android:text="This is a normal activity"
        />
</LinearLayout>
- 创建
LifeCycleActivity,参考代码如下。
- LifeCycleActivity.java
package iot.app.chp01.lifecycle;

import android.content.Intent;
import android.os.Bundle;
import android.util.Log;
import android.view.View;
import android.widget.Button;

import androidx.appcompat.app.AppCompatActivity;

import iot.app.chp01.R;

public class LifeCycleActivity extends AppCompatActivity {

    public static final String TAG = "LifeCycleActivity";

    @Override
    protected void onCreate(Bundle savedInstanceState) {
        super.onCreate(savedInstanceState);
        Log.d(TAG, "onCreate");
        setContentView(R.layout.activity_lifecycle);
        Button startNormalBtn = (Button) findViewById(R.id.start_normal_activity);
        Button startDialogBtn = (Button) findViewById(R.id.start_dialog_activity);
        startNormalBtn.setOnClickListener(new View.OnClickListener() {
            @Override
            public void onClick(View v) {
                Intent intent = new Intent("android.intent.action.NORMAL");
                startActivity(intent);
            }
        });
        startDialogBtn.setOnClickListener(new View.OnClickListener() {
            @Override
            public void onClick(View v) {
                Intent intent = new Intent(LifeCycleActivity.this, DialogActivity.class);
                startActivity(intent);
            }
        });
    }

    @Override
    protected void onStart() {
        super.onStart();
        Log.d(TAG, "onStart");
    }

    @Override
    protected void onResume() {
        super.onResume();
        Log.d(TAG, "onResume");
    }

    @Override
    protected void onPause() {
        super.onPause();
        Log.d(TAG, "onPause");
    }

    @Override
    protected void onStop() {
        super.onStop();
        Log.d(TAG, "onStop");
    }

    @Override
    protected void onDestroy() {
        super.onDestroy();
        Log.d(TAG, "onDestroy");
    }

    @Override
    protected void onRestart() {
        super.onRestart();
        Log.d(TAG, "onRestart");
    }

}
- activity_lifecycle.xml
<?xml version="1.0" encoding="utf-8"?>
<androidx.constraintlayout.widget.ConstraintLayout xmlns:android="http://schemas.android.com/apk/res/android"
    xmlns:app="http://schemas.android.com/apk/res-auto"
    xmlns:tools="http://schemas.android.com/tools"
    android:layout_width="match_parent"
    android:layout_height="match_parent"
    tools:context=".lifecycle.LifeCycleActivity">

    <LinearLayout
        android:layout_width="match_parent"
        android:layout_height="match_parent"
        android:orientation="vertical">

        <Button
            android:id="@+id/start_dialog_activity"
            android:layout_width="match_parent"
            android:layout_height="wrap_content"
            android:text="启动 DialogActivity" />

        <Button
            android:id="@+id/start_normal_activity"
            android:layout_width="match_parent"
            android:layout_height="wrap_content"
            android:text="启动 NormalActivity" />
    </LinearLayout>

</androidx.constraintlayout.widget.ConstraintLayout>
- 修改
AndroidManifest.xml,设置LifeCycleActivity为主活动。
【实验名称】 实验2.3 观察任务(Task) 的返回栈(Back Stack)
【实验目的】
- 理解任务栈的概念和观察方法
【实验环境】
- 一台运行 64 位版本的 Windows(8、10 或 11)、Linux、macOS(10.14 Mojave 或更高版本)或 Chrome 操作系统的计算机。
- 计算机可以访问互联网。
- 内存:至少6G
- 硬盘:至少空余20G
【实验要求】
- 分别执行以下动作,并记录结果到你的实验报告。
(1)启动LifeCycleActivity,点击启动 DialogActivity,输入命令观察返回栈内容。
(2)启动LifeCycleActivity,点击启动 NormalActivity,输入命令观察返回栈内容。
【实验步骤】
- 启动
LifeCycleActivity,点击启动 DialogActivity按钮。 - 在Terminal输入命令观察返回栈内容。
adb shell dumpsys activity
- 在 Terminal 输出内容查找到类似以下内容。重点观察
Running activities (most recent first):这部分的返回栈记录。
ACTIVITY MANAGER ACTIVITIES (dumpsys activity activities)
Display #0 (activities from top to bottom):
  Stack #1:
  mFullscreen=true
  mBounds=null
    Task id #58
    mFullscreen=true
    mBounds=null
    mMinWidth=-1
    mMinHeight=-1
    mLastNonFullscreenBounds=null
      TaskRecord{126a601 #58 A=iot.app.chp01 U=0 StackId=1 sz=2}
      Intent { act=android.intent.action.MAIN cat=[android.intent.category.LAUNCHER] flg=0x10000000 cmp=iot.app.chp01/.NavActivity }
        Hist #1: ActivityRecord{a3c81ac u0 iot.app.chp01/.lifecycle.LifeCycleActivity t58}
          Intent { cmp=iot.app.chp01/.lifecycle.LifeCycleActivity }
          ProcessRecord{4316d32 14705:iot.app.chp01/u0a84}
        Hist #0: ActivityRecord{793ff3a u0 iot.app.chp01/.NavActivity t58}
          Intent { act=android.intent.action.MAIN cat=[android.intent.category.LAUNCHER] flg=0x10000000 cmp=iot.app.chp01/.NavActivity }
          ProcessRecord{4316d32 14705:iot.app.chp01/u0a84}

    Running activities (most recent first):
      TaskRecord{126a601 #58 A=iot.app.chp01 U=0 StackId=1 sz=2}
        Run #1: ActivityRecord{a3c81ac u0 iot.app.chp01/.lifecycle.LifeCycleActivity t58}
        Run #0: ActivityRecord{793ff3a u0 iot.app.chp01/.NavActivity t58}

    mResumedActivity: ActivityRecord{a3c81ac u0 iot.app.chp01/.lifecycle.LifeCycleActivity t58}
- 启动
LifeCycleActivity,点击启动 NormalActivity,输入命令,再次观察任务返回栈的内容。
【实验名称】 实验2.4 设计一个注册界面
【实验目的】
- 掌握使用 Android 布局和组件实现界面
【实验环境】
- 一台运行 64 位版本的 Windows(8、10 或 11)、Linux、macOS(10.14 Mojave 或更高版本)或 Chrome 操作系统的计算机。
- 计算机可以访问互联网。
- 内存:至少6G
- 硬盘:至少空余20G
【实验要求】
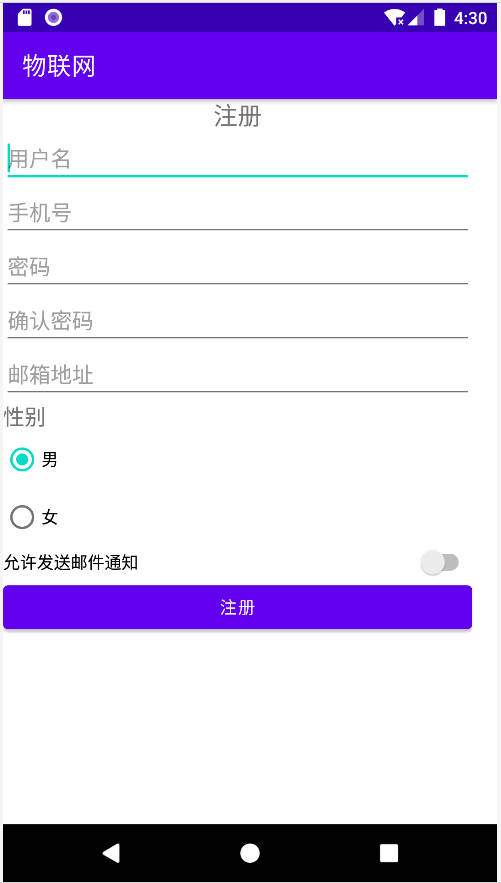
- 新建一个RegisterActivity,拖拽组件实现以下注册界面
【实验步骤】
新建一个
Empty Activity,命名为RegisterActivity。拖拽布局和组件实现注册界面。
设置
RegisterActivity为主活动。
【实验名称】 实验2.5 实现碎片替换
【实验目的】
- 掌握使用 Android 的 Fragment
【实验环境】
- 一台运行 64 位版本的 Windows(8、10 或 11)、Linux、macOS(10.14 Mojave 或更高版本)或 Chrome 操作系统的计算机。
- 计算机可以访问互联网。
- 内存:至少6G
- 硬盘:至少空余20G
【实验要求】
- 新建一个Activity,实现右边碎片的替换。
【实验步骤】
- 新建一个活动
TabActivity。
TabActivity.java
package iot.app.chp01.fragment;

import android.os.Bundle;

import androidx.appcompat.app.AppCompatActivity;

import iot.app.chp01.R;

public class TabActivity extends AppCompatActivity  {

    @Override
    protected void onCreate(Bundle savedInstanceState) {
        super.onCreate(savedInstanceState);
        setContentView(R.layout.activity_tab);
    }

}
activity_tab.xml
<?xml version="1.0" encoding="utf-8"?>
<LinearLayout xmlns:android="http://schemas.android.com/apk/res/android"
    android:orientation="horizontal"
    android:layout_width="match_parent"
    android:layout_height="match_parent" >

    <androidx.fragment.app.FragmentContainerView
        android:id="@+id/left_fragment"
        android:name="iot.app.chp01.fragment.LeftFragment"
        android:layout_width="0dp"
        android:layout_height="match_parent"
        android:layout_weight="1" />

    <androidx.fragment.app.FragmentContainerView
        android:id="@+id/right_fragment"
        android:name="iot.app.chp01.fragment.RightFragment"
        android:layout_width="0dp"
        android:layout_height="match_parent"
        android:layout_weight="1" />

</LinearLayout>
- 新建一个碎片
LeftFragment。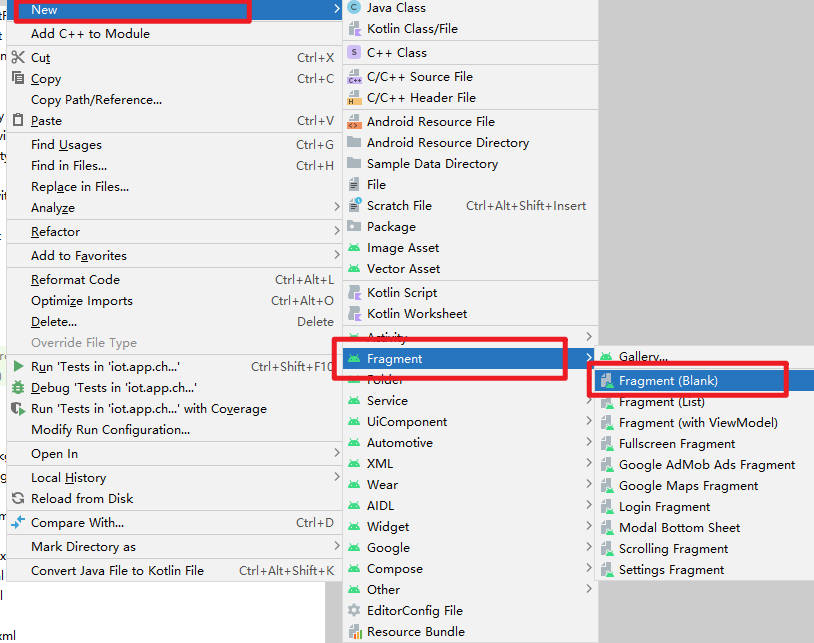
LeftFragment.java
package iot.app.chp01.fragment;

import android.os.Bundle;
import android.util.Log;
import android.view.LayoutInflater;
import android.view.View;
import android.view.ViewGroup;
import android.widget.Button;

import iot.app.chp01.R;
import androidx.fragment.app.Fragment;
import androidx.fragment.app.FragmentManager;
import androidx.fragment.app.FragmentTransaction;

public class LeftFragment extends Fragment implements View.OnClickListener{

    @Override
    public View onCreateView(LayoutInflater inflater, ViewGroup container,
                             Bundle savedInstanceState) {
        View view = inflater.inflate(R.layout.fragement_left, container, false);
        Button button = (Button)view.findViewById(R.id.button3);
        Log.d("TabActivity",String.valueOf(button));
        button.setOnClickListener(this);
        return view;
    }

    @Override
    public void onClick(View v) {
        switch (v.getId()) {
            case R.id.button3:
                replaceFragment(new AnotherRightFragment());
                break;
            default:
                break;
        }
    }

    /**
     * 替换碎片
     * @param fragment
     */
    private void replaceFragment(Fragment fragment) {
        FragmentManager fragmentManager = getParentFragmentManager();
        FragmentTransaction transaction = fragmentManager.beginTransaction();
        transaction.replace(R.id.right_fragment, fragment);
        transaction.addToBackStack(null);
        transaction.commit();
    }
}
fragement_left.xml
<?xml version="1.0" encoding="utf-8"?>
<LinearLayout xmlns:android="http://schemas.android.com/apk/res/android"
android:orientation="vertical"
android:layout_width="match_parent"
android:layout_height="match_parent">
<TextView
android:id="@+id/textView4"
android:layout_width="match_parent"
android:layout_height="wrap_content"
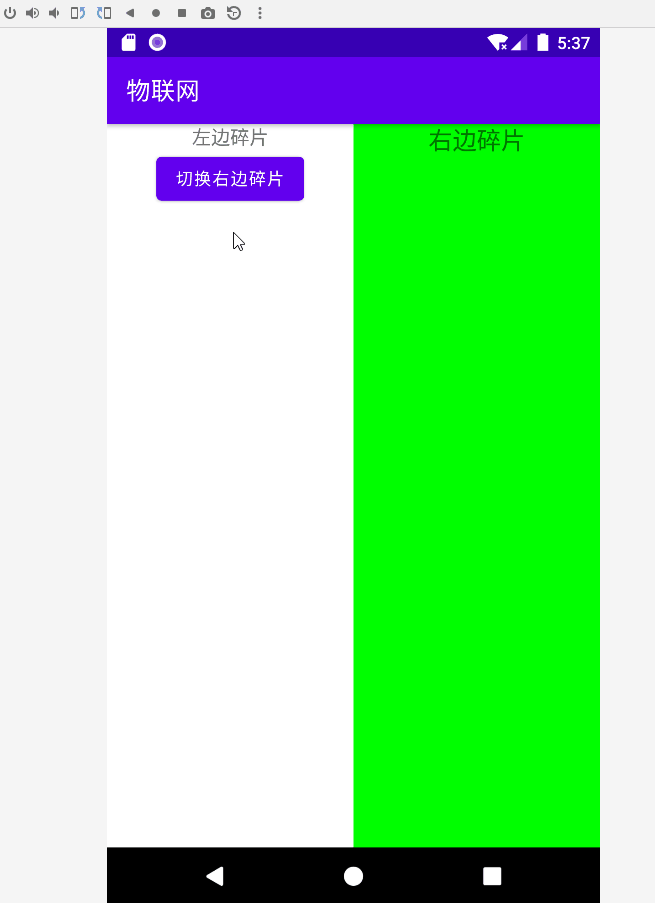
android:text="左边碎片"
android:textAlignment="center"
android:textSize="16sp" />
<Button
android:id="@+id/button3"
android:layout_width="wrap_content"
android:layout_height="wrap_content"
android:layout_gravity="center_horizontal"
android:text="切换右边碎片" />
</LinearLayout>
- 新建一个碎片
RightFragment
RightFragment.java
package iot.app.chp01.fragment;

import android.content.Context;
import android.os.Bundle;
import android.util.Log;
import android.view.LayoutInflater;
import android.view.View;
import android.view.ViewGroup;
import iot.app.chp01.R;
import androidx.fragment.app.Fragment;

public class RightFragment extends Fragment {

    public static final String TAG = "RightFragment";

    @Override
    public void onAttach(Context context) {
        super.onAttach(context);
        Log.d(TAG, "onAttach");
    }

    @Override
    public void onCreate(Bundle savedInstanceState) {
        super.onCreate(savedInstanceState);
        Log.d(TAG, "onCreate");
    }

    @Override
    public View onCreateView(LayoutInflater inflater, ViewGroup container,
                             Bundle savedInstanceState) {
        Log.d(TAG, "onCreateView");
        View view = inflater.inflate(R.layout.fragement_right, container, false);
        return view;
    }

    @Override
    public void onActivityCreated(Bundle savedInstanceState) {
        super.onActivityCreated(savedInstanceState);
        Log.d(TAG, "onActivityCreated");
    }

    @Override
    public void onStart() {
        super.onStart();
        Log.d(TAG, "onStart");
    }

    @Override
    public void onResume() {
        super.onResume();
        Log.d(TAG, "onResume");
    }

    @Override
    public void onPause() {
        super.onPause();
        Log.d(TAG, "onPause");
    }

    @Override
    public void onStop() {
        super.onStop();
        Log.d(TAG, "onStop");
    }

    @Override
    public void onDestroyView() {
        super.onDestroyView();
        Log.d(TAG, "onDestroyView");
    }

    @Override
    public void onDestroy() {
        super.onDestroy();
        Log.d(TAG, "onDestroy");
    }

    @Override
    public void onDetach() {
        super.onDetach();
        Log.d(TAG, "onDetach");
    }

}
fragement_right.xml
<?xml version="1.0" encoding="utf-8"?>
<FrameLayout xmlns:android="http://schemas.android.com/apk/res/android"
    android:orientation="vertical"
    android:background="#00ff00"
    android:layout_width="match_parent"
    android:layout_height="match_parent">

    <TextView
        android:layout_width="wrap_content"
        android:layout_height="wrap_content"
        android:layout_gravity="center_horizontal"
        android:text="右边碎片"
        android:textAlignment="center"
        android:textSize="20sp" />

</FrameLayout>
- 新建一个新的右边碎片,用于覆盖原有右边碎片。
AnotherRightFragment.java
package iot.app.chp01.fragment;

import android.os.Bundle;
import android.view.LayoutInflater;
import android.view.View;
import android.view.ViewGroup;
import iot.app.chp01.R;
import androidx.fragment.app.Fragment;

public class AnotherRightFragment extends Fragment {

    @Override
    public View onCreateView(LayoutInflater inflater, ViewGroup container,
                             Bundle savedInstanceState) {
        View view = inflater.inflate(R.layout.fragement_right2, container, false);
        return view;
    }

}
fragement_right2.xml
<?xml version="1.0" encoding="utf-8"?>
<FrameLayout xmlns:android="http://schemas.android.com/apk/res/android"
    android:orientation="vertical"
    android:background="#ffff00"
    android:layout_width="match_parent"
    android:layout_height="match_parent">

    <TextView
        android:layout_width="wrap_content"
        android:layout_height="wrap_content"
        android:layout_gravity="center_horizontal"
        android:text="替换为新的碎片"
        android:textAlignment="center"
        android:textSize="20sp" />

</FrameLayout>
【实验名称】 实验2.6 实现登录跳转
【实验目的】
- 掌握使用布局(Layout)和组件进行界面设计
- 掌握活动之间的跳转
【实验环境】
- 一台运行 64 位版本的 Windows(8、10 或 11)、Linux、macOS(10.14 Mojave 或更高版本)或 Chrome 操作系统的计算机。
- 计算机可以访问互联网。
- 内存:至少6G
- 硬盘:至少空余20G
【实验要求】
- 新建
LoginActivity和DashboardActivity,实现点击 LoginActivity 的登录按钮跳转到DashboardActivity。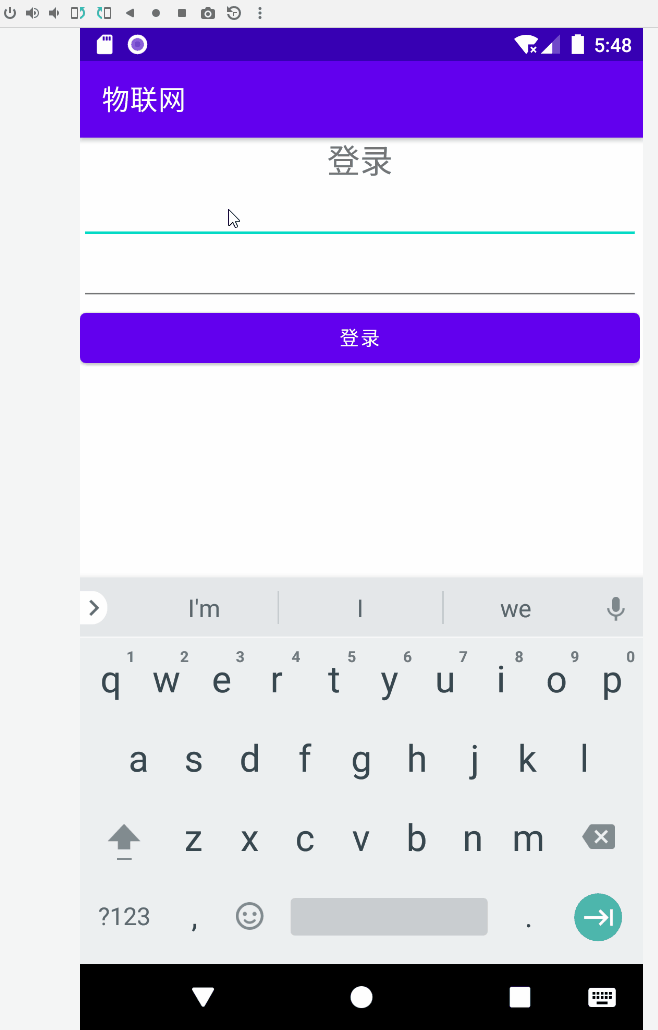
【实验步骤】
- 请同学们自行实现。
【常见问题】
1. Android Studio 提示 adb 命令找不到。
答:
可以打开 Android Studio 设置,
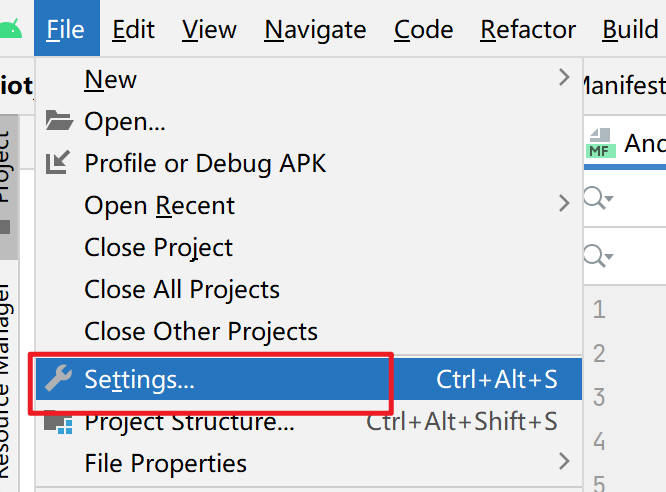
在
Terminal选项,打开环境设置窗口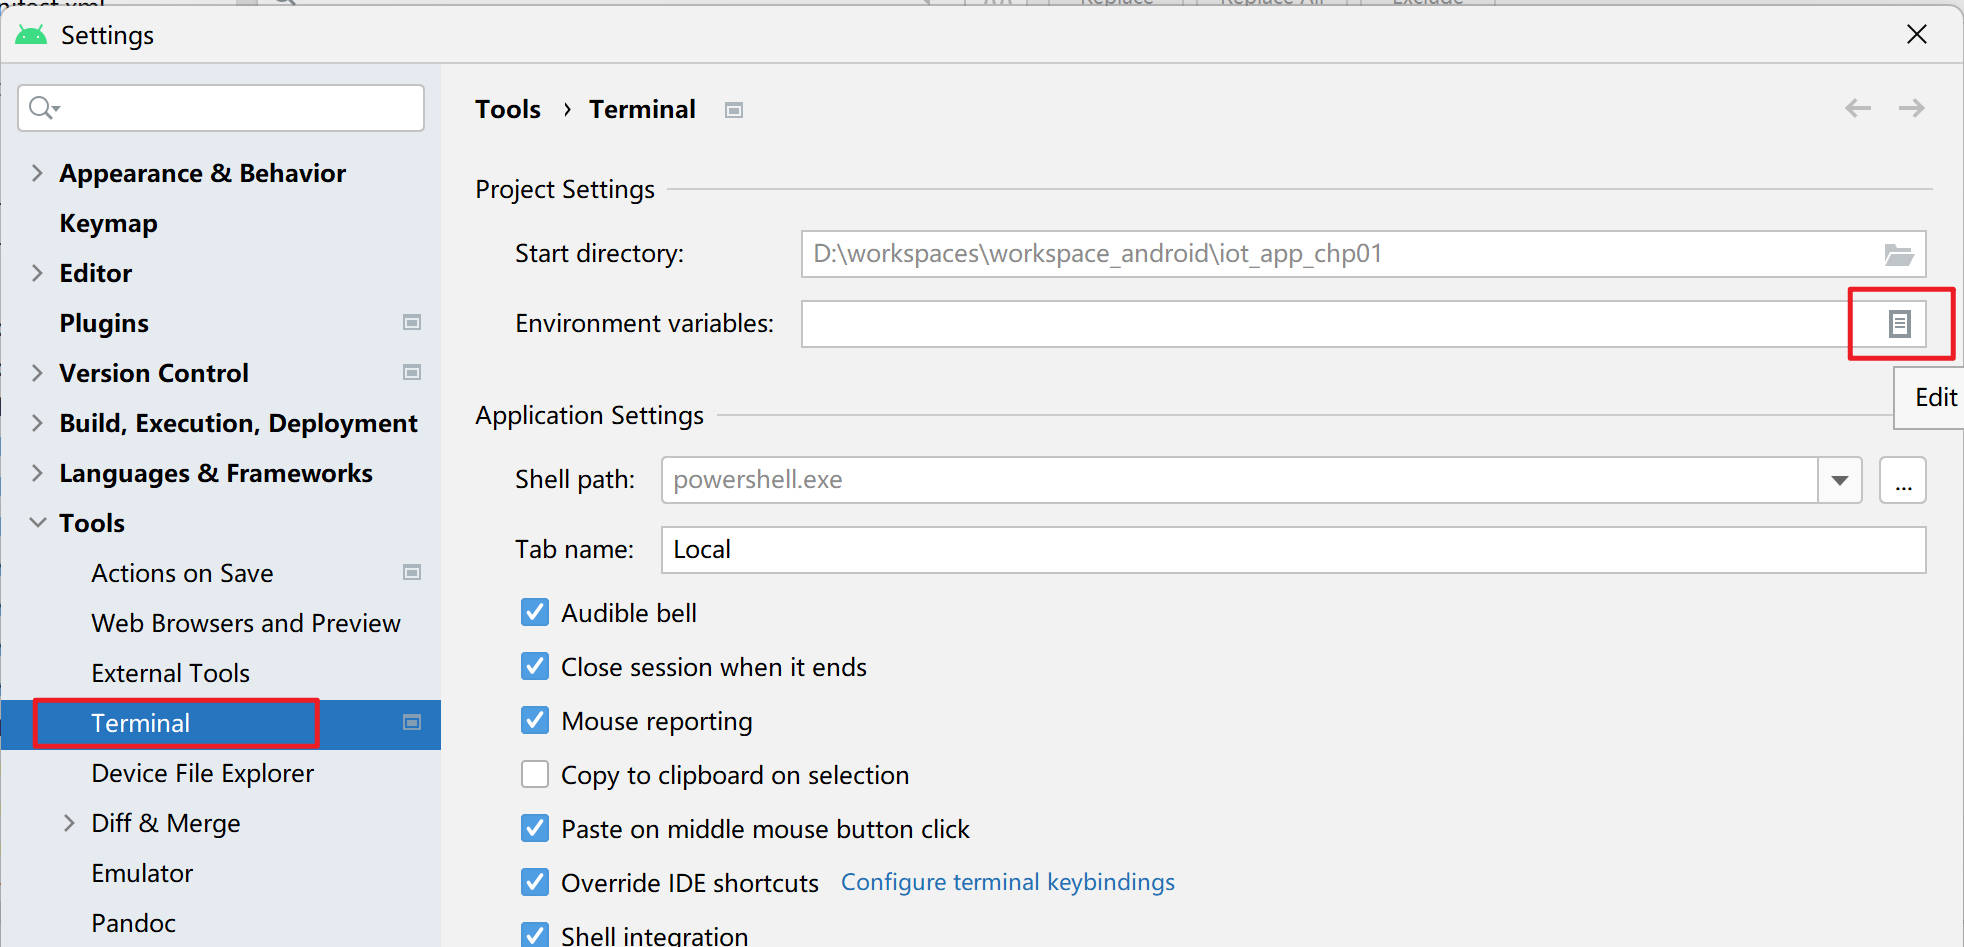
增加环境变量
PATH-> 指向的目录是你的SDK安装目录\platform-tools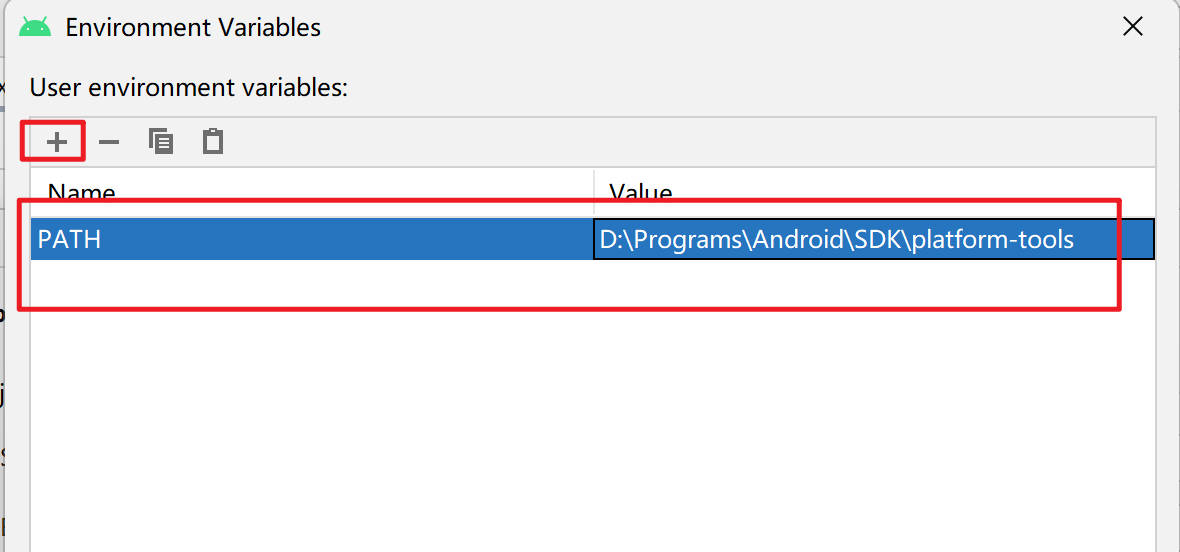
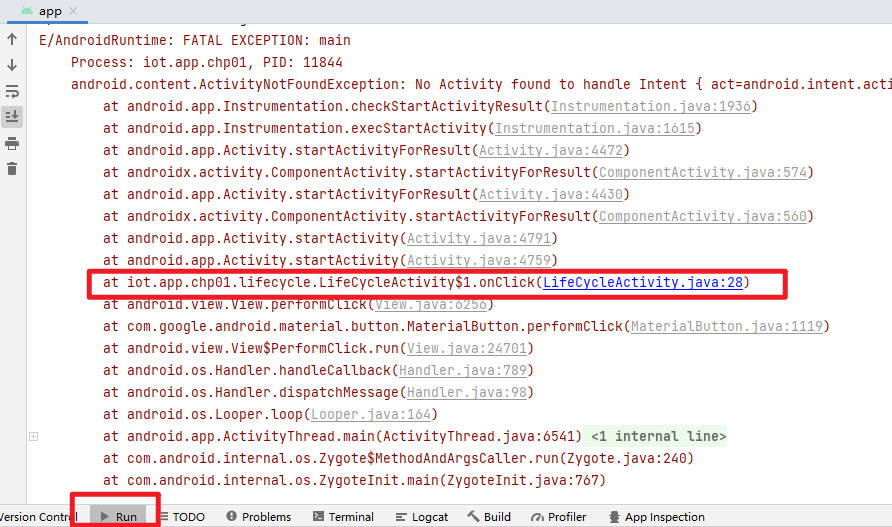
2. App 显示 “has stopped” 异常退出怎么调试
 答:可以在
答:可以在 Run 控制台输出界面查找程序抛出的异常信息。重点定位到你编写的代码出错的位置,和具体抛出的异常消息。
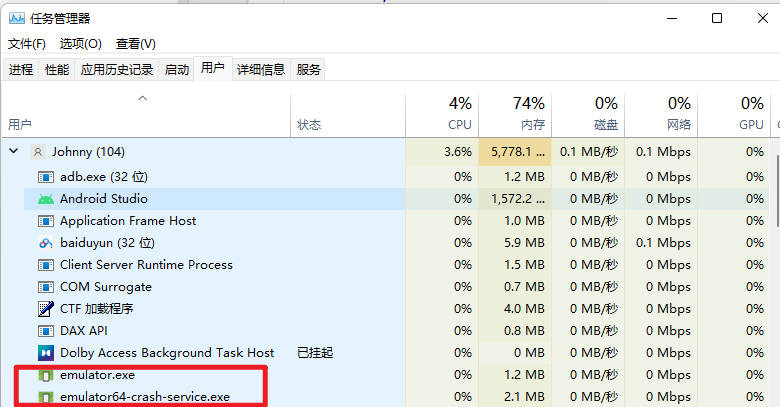
3. 模拟器无法启动,提示delete the files at **.lock and try again,类似以下内容。
AVD 4_WVGA_Nexus_S_API_28 is already running.
If that is not the case, delete the files at
   C:\Users\000\.android\avd/4_WVGA_Nexus_S_API_28.avd/*.lock
and try again.
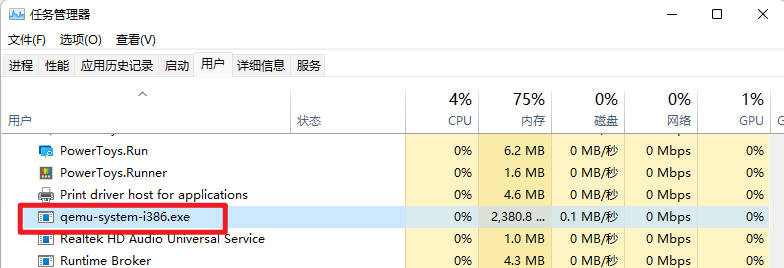
答:这种情况多数是因为模拟器异常退出,但是进程没有结束导致的。请打开系统的任务管理器,结束以下进程。
qemu-system-i386.exe
emulator.exe
emulator64-crash-service.exe
4. 编译项目提示“failed linking references”错误。
答:把模块的构建配置项目名\app\build.gradle修改compileSdk为更高的版本,例如32。

5. 无法发布应用到模拟器。
答:
可以关闭 Android Studio。
删除项目下的
.idea目录重新打开 Android Studio 测试是否能够正常发布。